NB: The guide assumes that the reader can purchase luxury items and platinum items.
Abstract
I. IntroductionDruids harness the vast powers of nature to preserve or destroy life. With increased experience, they can unleash the raw energy of nature to destroy their enemies, dishing out celestial fury on them from a distance, choking them with enchanted vines, or ensnaring them in immobilizing roots. They can also direct this power to heal wounds and restore life to fallen friends and allies.
The druid is hybrid class and is one of the most versatile, under-estimated class in the game. As with other hybrids, druids need to specialize to be most effective in any of the roles they choose. Due to the opposing nature of these roles, they cannot perform one role fully without compromising the other. Therefore, druids must switch between roles (optimally with a change of equipment or through a rebirth/alteration) to adapt to a changing situation.
Starting Out/Pre-requisites
The first thing a starting druid should do when landing on the beach is run to Farcrag Castle and purchase the following:
If you are wealthy and want to run faster, consider purchasing the following for an additional 150 000 gp:
II. Leveling
Levels 1-20
For these first few levels, simply follow the starting-line quests. Start by talking to Brennan the Mighty and complete the chain quests. Along your way, make sure to complete Declan's ring quest.
Levels 20-30
Make your way to Dustwither Catacombs and run along the chambers killing the different mobs. Move along the rooms progressively as you level. Once you reach lvl 25, move on to the Death's Caress leystone and navigate those rooms, killing mobs on the western and eastern side.
Levels 30-54
One of the fastest ways of training now is at Shalemont Ravine. Progressively move through the map as you gain levels and most importantly complete the quest line along the way because it provides free experience.
Levels 54-58
Head to the boar pit in the Northern Road of Stonevale. Things will feel like they are slowing down but stay stubborn and true to your goal because it will pay off!
Levels 58-60
Kill the nasty fairies behind Stonevale Farm. Be careful not to attract the other fairies as the Glimmerwing Loredancers can be deadly with their energy shield and firebolts.
Levels 60-70
Kill the blue wisps on the path going off from the farm, then run parallel to the wall, making sure to kill the white wisps on the way until you reach the northern side of stone vale and enter the path on your right containing more blue wisps. Kill those and key back to farm.
Rinse and Repeat.
Levels 70-87
Head to Loch Dorcha in Fingal's cave to Pirate's island. Progressively move forward as you level. These are very easy to kill as they have low hit points, however they can have high auto damage so be careful.
Levels 87-93
Kill the purple eyes in Otherworld. They will be tough at first but once you reach level 90, they should start getting easier.
Levels 93-99/100
Head over to the dark blue eyes and kick their butts.
To be continued ...
III. Types and Respective Roles
1. Healer - Monk Mode
A healer is, without doubt, one of the most important asset in a clan and on raids. A druid's healing spells have the potential to be more powerful than any health-restoring skills in celtic heroes. As such, a clan cannot function without a a healer nor can it take down difficult bosses such as Hrungnir, Mordris or the Necromancer without a significant amount of druids.
One thing to keep in mind is that a Monk mode druid cannot be held responsible for not having all healing skills maxed and useful. It is the job of the clan to separate those duties amongst the different druids. For example, one druid may be specialized in certain wards and HOT skills while another may choose to specialize in armor/hp buffs and group and individual heals.
The main role of an elite healer is to keep his assigned target alive (i.e: keeping the tank alive, healing allies from AOE's etc.)
This obviously means that your nature's touch as well as your heal-over-time spells need to be able to sustain these player's health at a reasonable rate. As such, your main role is to keep the tank alive because if the tank dies, the raid is over, and you have failed your mission.
The second, most important role is to keep yourself alive because if you die, then the main tank receives no heals. If you have not managed to get back up and heal him, and if he dies, you all fail. This means figuring out the range of AOE skills and keeping away from it usually by standing behind the tank but it could vary and you may have to stand on the side of the damage dealers of the group.
Long story short:
Other important roles include:STAY ALIVE, KEEP TARGET ALIVE
-Keeping your energy and health stable and above 50% - if your energy and health are fluctuating and drop below a certain amount, then you may die or be unable to cast a critical skill during the raid. This means you are as good as nothing. If you cannot maintain your energy, then you should not consider yourself a healer because then you will have failed your two main goals. If your energy does not fall below 50%, then you are on the right path to success.
-Concentrate on the boss skill messages - some bosses will call aids during the fight and as such, be prepared to act in a planned out, intelligent manner to take out or help take out the threat.
2. DPS-druid - Feral Mode
Contrary to a healer whose goal is to preserve life, a damage dealing druid's main goal is to kill. A DPS-druid relies on burst damage skills and damage-over-time (DOT) skills to bring his enemies to submission. However, unlike his DPS counterparts (i.e: rogues, rangers), a DPS-druid has relatively low armor, weaker auto, and in general inferior damage. This does not mean that a smart player cannot outwit/outdps a rogue for example. It just means that it will be difficult for a druid to get the kill over a well-geared, top dps counterpart.
The main role of a dps-druid is therefore to deal as much damage possible in a fixed interval of time. You need not worry about healing as this is not your concern anymore. Your focus is on the targeted raid boss and potentially adds and incoming threats.
This entails that your damage dealing skills such as storm's touch, lightning strike, stinging swarm, and strangling vines need to be maxed in order to maximize dealt damage.
The second most important role is to keep yourself alive. This means avoiding AOE's as much as possible, playing intelligently and not doing anything stupid that could jeopardize the mission.
Long story short:
Other important roles and things to keep in mind:KILL, KILL, KILL !
-Keeping your energy and health stable and above 50% - if your energy and health are fluctuating and drop below a certain amount, then you may die or be unable to sustain your skills which may be demanding in energy at higher levels. If your energy does not fall below 50%, then you are on the right path to success.
-Concentrate on the boss skill messages - Be aware of your surroundings. Be ready to jump in when adds spawn to neutralize and kick their butts.
-Play Smart - Don't just sit blandly on the couch and repeatedly spam skills. This will achieve nothing but drain your energy and ultimately make you spend gold/plat on items you may have avoided using. DOT skills have a certain time limit on them. Only cast the skill when the previous is just about to end. Also, be aware that they may be other damage dealing druids in the group who may have a higher level skill than you. Thus, they may override your skills which means you would ultimately be losing energy which could have been put to better use.
3. Hybrid - God Mode
By far my favorite build for a druid, God mode combines the two previous builds, yielding a deadly monk who can heal significantly, and deal damage significantly. This mode relies mostly on your equipment. Just with a few switches, you can go from a gentle healer to a crazy lightning wielding maniac
While it may sound like the main role of this class is to do 50% of both, a hybrid druid uses his skills mostly to heal the tank and to dish out damage on the side when possible. Remember: once you have been assigned that goal of healing the tank, then you MUST, at all costs, keep that tank alive and this means sacrificing some of your dps to achieve that goal.
Thus you will have two main goals:
1. Keep your target alive.
2. Cast DOT's on the raid boss to decrease kill time.
Again, I cannot stress how useful this build is. And any druid can have the power to do so. The power of this build relies on your ability to switch skills by switching gear. A rogue cannot do that for instance. If he takes out his skill rings or bracers, then his skill damage will go up, but his auto damage will not go up that significantly because raid bosses have huge pierce resistance. Keep that in mind !
IV. Stats
Understanding what stats to have means maximizing the gain of every stat point gained through leveling. A nice to note with druids is that all three builds have approximately the same build. That is that all points should go into Vitality and Focus.
-Vitality determines the total amount of hitpoints(or health) your character has available. When your hitpoints reach zero your character dies. Even though death in Celtic Heroes is only temporary, this statistic is useful to everyone, but particularly to those characters who are likely to take a lot of damage
-Focus: Focus determines the total amount of energy your character has available to use on skills. More importantly, skill damages are directly related to focus. This means that the more points in focus you invest, the more potent said skill will be. (It does however reach a plateau but that is talk for later).
Here are examples of the formulas for level 50 druid skills:


The main rule for setting up your stats is to:
1. Have enough vitality (through the use of gear or stats) to survive a boss raid or to level in general.
2. In function of that, allocate the rest of the points into focus.
Whilst at lower levels, you will want to aim for:
-1500-2000 HP
-Max Amount of Focus
For higher levels, you will want to aim for:
-2500-3000+ HP
-Max Amount of Focus
Use a rebirth. Start by equipping whatever armour you are currently using. By checking how much HP you currently have with what you have equipped, start by adding points into vitality. Once your are confident that you have enough health (this usually comes with experience and through trial and error), allocate the rest of the points into focus.
V. Equipment
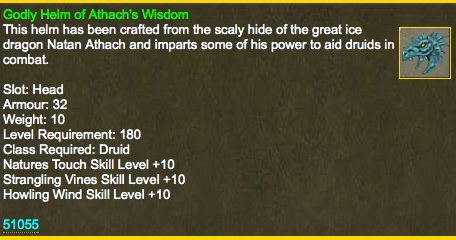
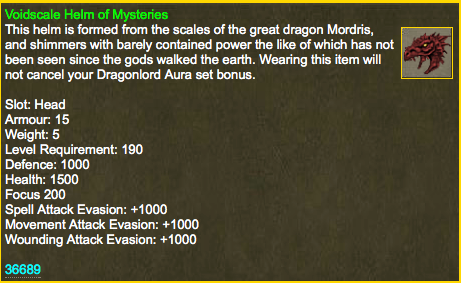
Dragonlord Helm < Athach's Wisdom < Darkscale < Shadowhelm < Voidscale Helm of the Mysteries (Monk Mode - Feral Mode - Hybrid Mode)
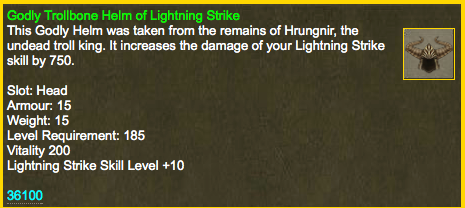
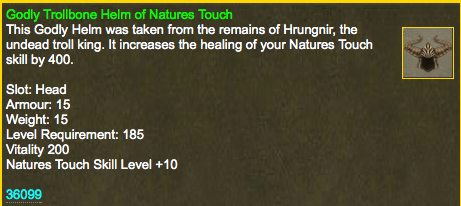
Head slots will not matter much till you can use hrungnir helms and/or mordris helms. Don't worry too much about it:
A Hybrid - Feral Druid may prefer a Hrungnir Lightning Strike Helm:
Meadowsum Body < Warden Body < Topaz Body < Opal Body < Meteoric Body < Frozen Body < Adamant Body < Beastbone Body < Dragonlord Body
Legs Slot:
Meadowsum Legs < Warden Legs < Topaz Legs < Opal Legs < Meteoric Legs < Frozen Legs < Adamant Legs < Beastbone Legs < Dragonlord Legs - (Monk Mode - Hybrid Mode)
Meadowsum Legs < Warden Legs < Topaz Legs < Opal Legs < Meteoric Legs < Frozen Legs < Adamant Legs < DragonLord Legs < Breastbone Legs - (Feral Mode)
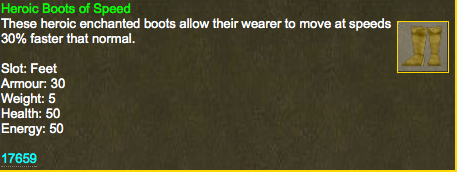
Feet Slot:
Heroic Boots of Speed < Breastbone Boots < Dragonlord Boots
Hand Slot:
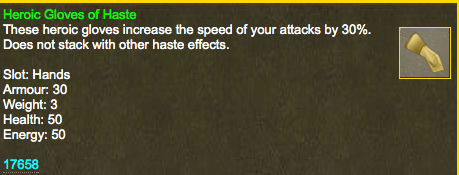
Heroic Gloves of Haste < Adamant Gloves < Breastbone Gloves < Dragonlord Gloves
OffHand Slot:
Golden Trident of X < Focus of the Seer < Shield of the Bastion < Dragonlord Codex - (Leveling Mode)
For leveling, it's more of a preference when choosing your offhand. If you are confident in the amount of vitality and focus you have, then opt for a shield if you are solo training or an axe of triumph. If you want absolute more increased power, buy a focus. What I am trying to drive home is that survivability trumps damage any day. This is because increased survivability means more damage in the long run.
Focus of the Mystic < Dragonlord Codex - (Monk - Hybrid Mode)
Weapon Slot:
Opal Icon < Adamant Icon < Ancient Wyrmbone Totem < DragonLord Totem < Any Void Skull from Hrungnir (Lightning Strike and Grasping Roots) - (Feral Mode)
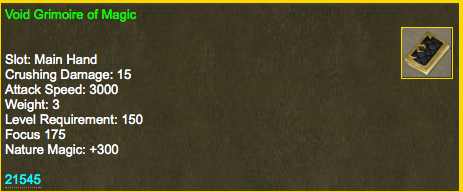
Opal Icon < Adamant Icon < Void Aggragoth Grimoire < DragonLord Totem < Mordris Grimoire< Any Void Skull from Hrungnir (Natures Touch) - (Monk Mode - Hybrid Mode )


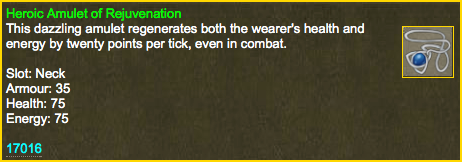
Heroic Amulet of Rejuvenation < Talisman of the Stars < Sunshard Pendant of the Silent Forest < Icecrystal Pendant of the Storm's Eye < Garanak SpiritSeed Necklace < Garanak's Shrivewood Necklace
Miscellaneous Slot:
*Camouflage Charm* < Sunfire Charm of Lightning Strike < Sunfire Charm of Nature's Touch < Godly Bathide Charm < Garanak SpiritSeed Necklace < Garanak's Shrivewood Necklace
Sunfire Charm may be best for Monk Mode if you do not own Garanak gear.
Wrist Slot (x2):
At lower levels, aim for energy regeneration bracers. At 150, aim for Aggragoth bracers - pick wisely according to your mode. At high-end levels, aim for mordris bracers - again choose wisely.
Ring Slot (x3):
Feral Mode: Lightning Strike Rings, Stinging Swarm Rings, Strangling Vines Rings, Howling Wind Rings, Storm's Touch Rings.
Monk Mode: Nature's Touch Rings, Shield of Bark, Nature's Breath, Nature's Embrace.
Hybrid Mode: Mix both of the above.
At high-end levels, keep one ring slot open for the Garanak Ring to complete your Shrivewood or Spiritseed set.
VI. Druid Skills
a. Monk Mode
Nature's Touch: Your most potent skill in terms of being a healer. This skill heals a certain target's health by X amount and has a fairly short cool down which means it is your greatest tool in keeping your assigned target alive. Be careful not to waste the skill when a target is about to die. Hopefully this won't happen (also hopefully will be fixed in future builds of CH)
Nature's Breath: Summon a gentle breath of nature that restores X health to all group members in an 8 meter radius.
Shield of Bark: Call upon nature to clad yourself or an ally in an armour of bark increasing armour by X for 2 minutes.
Nature's Embrace: Call on nature to comfort an ally, recovering X health per tick, for 45 seconds.
Abundance: Fill the target with a sense of the abundance of nature, increasing their maximum health by X.
Sanctuary: You summon a shield of glittering light to that protects all party members in range from up to X damage for the next 30 seconds.
Abundant Aura: Create a powerful aura of abundance, increasing the health of your target and group members within 6 meters by X.
Wards: Cast a magical Ward upon all group members within 6 meters of your target, increasing resistance to X damage by X.
Spring of life: Call upon your nature magic to bring a fallen ally, of level X or lower back to life. Allies are revived with 1 hp, and will be healed for X after 5 seconds. Those revived by this spell do not suffer from the Curse of the Fallen. (POS skill)
Bless:Grants the target a blessing from Belenus, increasing all their Skill Evasions by X for the next 3 minutes, making it easier to avoid hostile skills.
Calm:Surround the target ally in a calming aura, easing the enemy's anger towards them.
Rescue: Teleport target ally below level X to your location. Rescued allies also regenerate X health per tick for 15 seconds.
Roots: Call upon your Nature Magic ability to ensnare any enemy up to level X, stopping them from moving for 20 seconds.
b. Feral Mode
Lightning Strike: Hurl a deadly bolt of lightning towards the enemy, dealing up to X magic damage.
Strangling Vines: Use your Nature Magic ability to entwine your enemy in a thorny embrace, dealing up to X damage per tick for 30 seconds. Arguably the best DOT skill. It has an average cool down at a high energy cost. Try casting it first when you are fighting an enemy as it is easily interrupted.
Stinging Swarm: Summons a swarm of tiny, stinging insects that deal X poison damage per tick to all enemies within 4 meters of the target, for 20 seconds. (poison damage based - a must for feral druids)
Storm's Touch: Call the fury of nature upon an enemy that you touch, dealing up to X damage.
Howling Wind: Use your Nature Magic ability to summon a howling wind that buffets your enemy, lowering their attack by X for 60 seconds.
Grasping Roots: Call upon your Nature Magic ability to ensnare any enemy up to level X, stopping them from moving for 20 seconds.
Energy Harvest: Transfer X energy from the target to yourself.
c. God Mode
You need to master your stats and equipment to be able to adjust the level of your skills so that they stay dent when you switch rings. Skills that you do not have rings for should have a higher amount of points allocated to them. Skills with high-tier rings should have less points invested in them (unless looking for 50/40) than other skills with lower-tier rings.
VII. AbilitiesExperiment, Experiment! It is only through trial and error that you can find the optimal points to invest in each skill.
Main Abilities
Nature's Magic: Nature's Magic affects your skills. The higher it is, the more powerful your skills will be. Keep it maxed.
Totem: If you are a feral druid, have this maxed. As you become stronger, high-end totems will give you decent amount of auto damage which can add flavor to your damage.
Evasion Abilities
Evasion, or the ability to evade skills is gained by acquiring evasion abilities. These are Fortitude, Warding, Willpower, Vigor and Reflex. Every 2 ability points boosts your evasion for that type of skill by 1. Ideally these abilities should be maxed or as high as possible.
Fortitude boosts Physical attack evasion – this is your ability to evade physical skills that do nothing but burst damage e.g. Giant swing, Pummel, Sharp shot
Warding boosts Magic attack evasion – this is your ability to evade magic skills that do nothing but burst damage e.g. Fire bolt, Lighting strike, Ice blast
Willpower boosts Weakening attack evasion – this Is your ability to evade debuff skills i.e. skills that lower your stats/attributes e.g. Howling wind, Smoke bomb
Vigour boosts Wounding attack evasion – this is your ability to evade skills that deal damage-over-time e.g. Strangling vines, Frostbite, Incinerate
Reflex boosts Movement attack evasion – this is your ability to evade skills that impair your movement e.g. Bolas, Grasping roots, Freeze
VIII. References
A big thank you to the following people:
- Swan's Auto-Attack and Skill Formula Index - http://celtic-heroes.com/forum/viewtopi ... ilit=index
- Immortalius' Warrior Tank Guide - http://celtic-heroes.com/forum/viewtopi ... 52&t=50842
- The site that must not be named - A
That's a wrap on the guide. This is the first of many to come. It will be updated once I figure out best loot from this Halloween Patch. Also, I have yet to finish the leveling part as I am trying to find best spots. Also photo bucket is down at the moment. Will be fixing the final look once it's back up. I appreciate any feedback you guys have.
As always, enjoy and happy hunting